Square Pedestal Table
 |
| Square Pedestal Table |
How to build a pedestal table - Most Recent Video
How to build a farmhouse pedestal table. Free plans from ana-white.com
HANDMADE FROM THIS PLAN >>
Projects built from this plan. Thank you for submitting brag posts, it's appreciated by all!
Handmade by: MicheleV
Author Notes:
Hi everyone and Happy Friday! Do you have lots of DIY plans this weekend? I hope so!
Do you remember when I teamed up with Ashley from Shanty2Chic to get you plans for the Triple Pedestal Table?
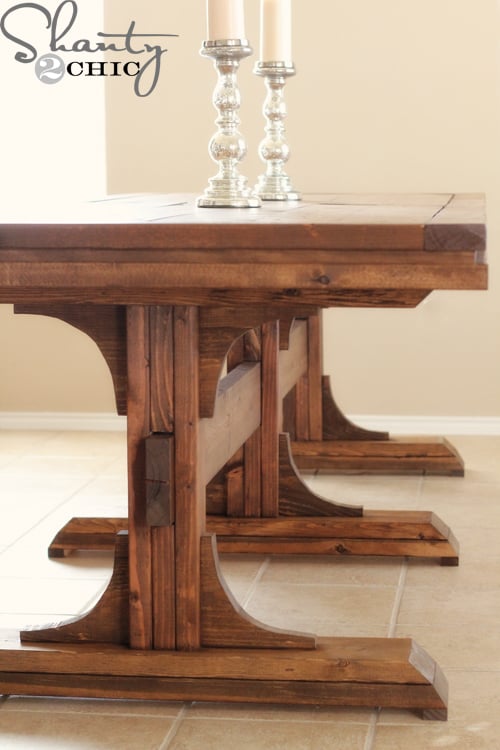
And then a matching bench?

Well, one of our fabulous builders, Tabitha, loved the table but thought having two square-ish tables to push together would be more ideal for her space. So she modified the plans to create a square version!
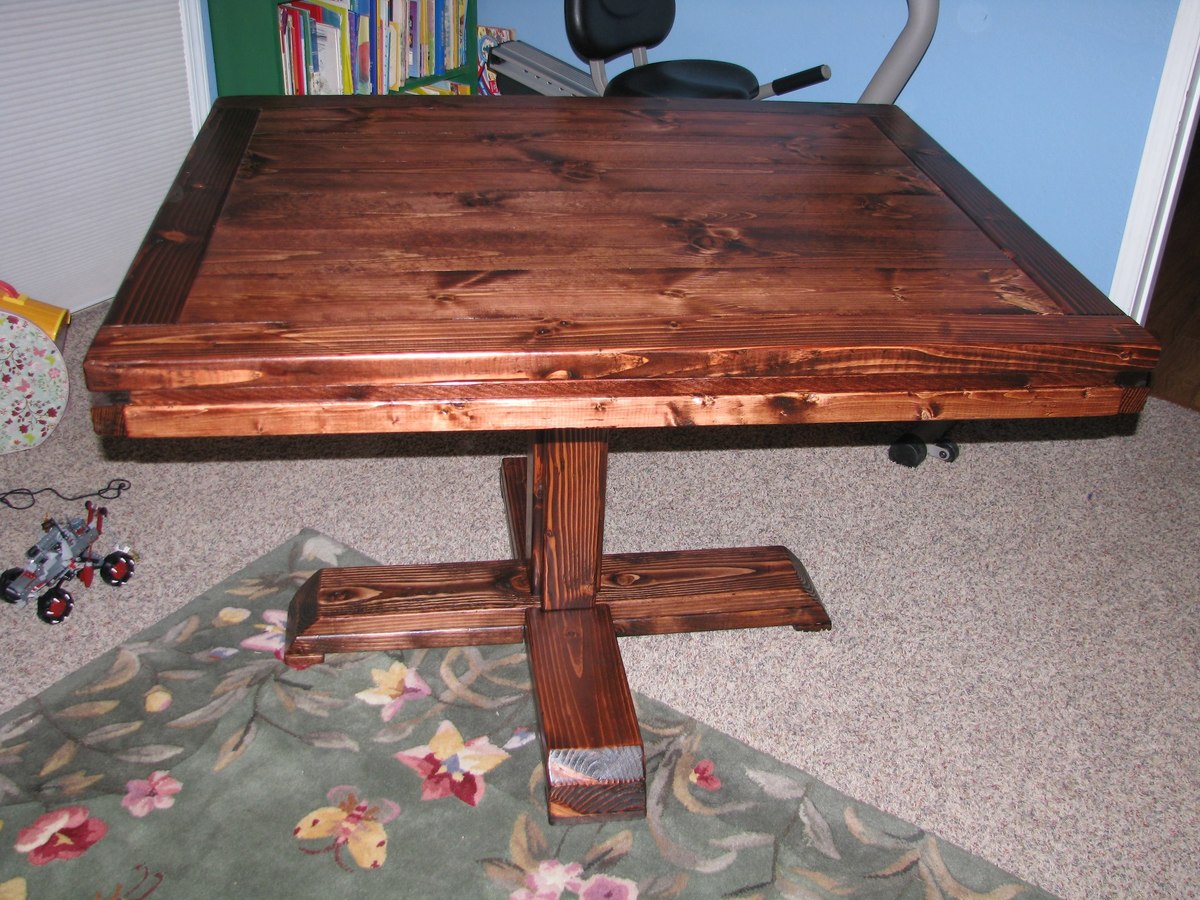
And Tabitha was not just awesome enough to share her table with us, but she sent me her instructions on how she built her tables!!! So we can share with you!!!
Tabitha had the absolutely brilliant idea of building two pedestal tables that she could put together for larger gatherings (I love this idea!) and custom fit the tables to her requirements (as you should when you build for yourself!). In this plan, we made the top a square to be the most versatile, but modify away!
Thank you so much Tabitha for sharing the plans with us! You are the best!
Shopping List:
3 - 2x4 @ 8 feet long
1 - 1x4 @ 6 feet long
1 - 2x8 @ 6 feet long
7 - 2x6 @ 8 feet long
2 - 1x2 @ 8 feet long
2 - 2x2 @ 8 feet long
2 1/2" or longer screws
2 1/2" pocket hole screws (recommended for top)
1 1/4" and 2" finish nails
wood glue
Tools:


Tape Measure
Speed Square
Pencil
Safety Glasses
Hearing Protection
Kreg Jig
Drill
Jigsaw
Miter Saw
Brad Nailer
Power Sander
Drill Bit Set
General Instructions:
Please read through the entire plan and all comments before beginning this project. It is also advisable to review the Getting Started Section. Take all necessary precautions to build safely and smartly. Work on a clean level surface, free of imperfections or debris. Always use straight boards. Check for square after each step. Always predrill holes before attaching with screws. Use glue with finish nails for a stronger hold. Wipe excess glue off bare wood for stained projects, as dried glue will not take stain. Be safe, have fun, and ask for help if you need it. Good luck!
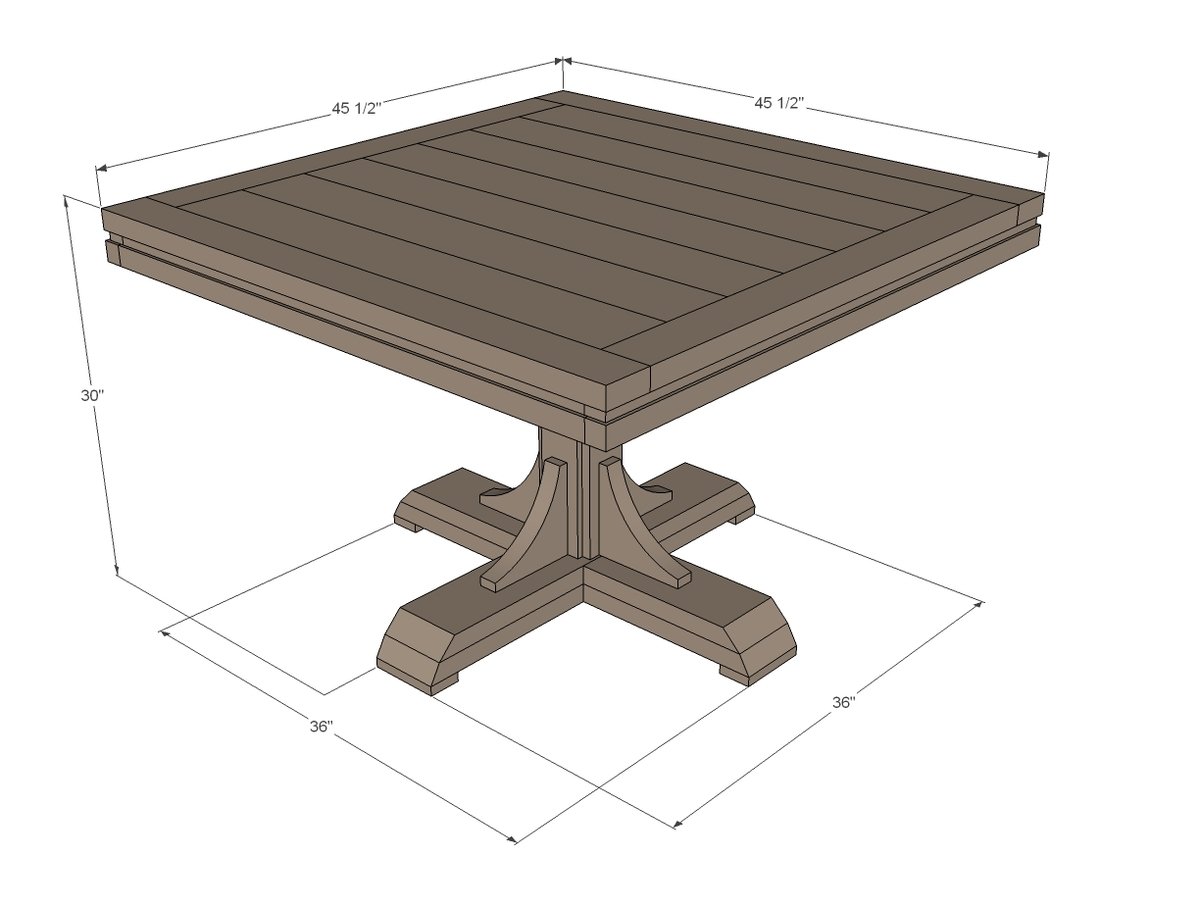
Dimensions:
Cut List:
PEDESTAL CENTER
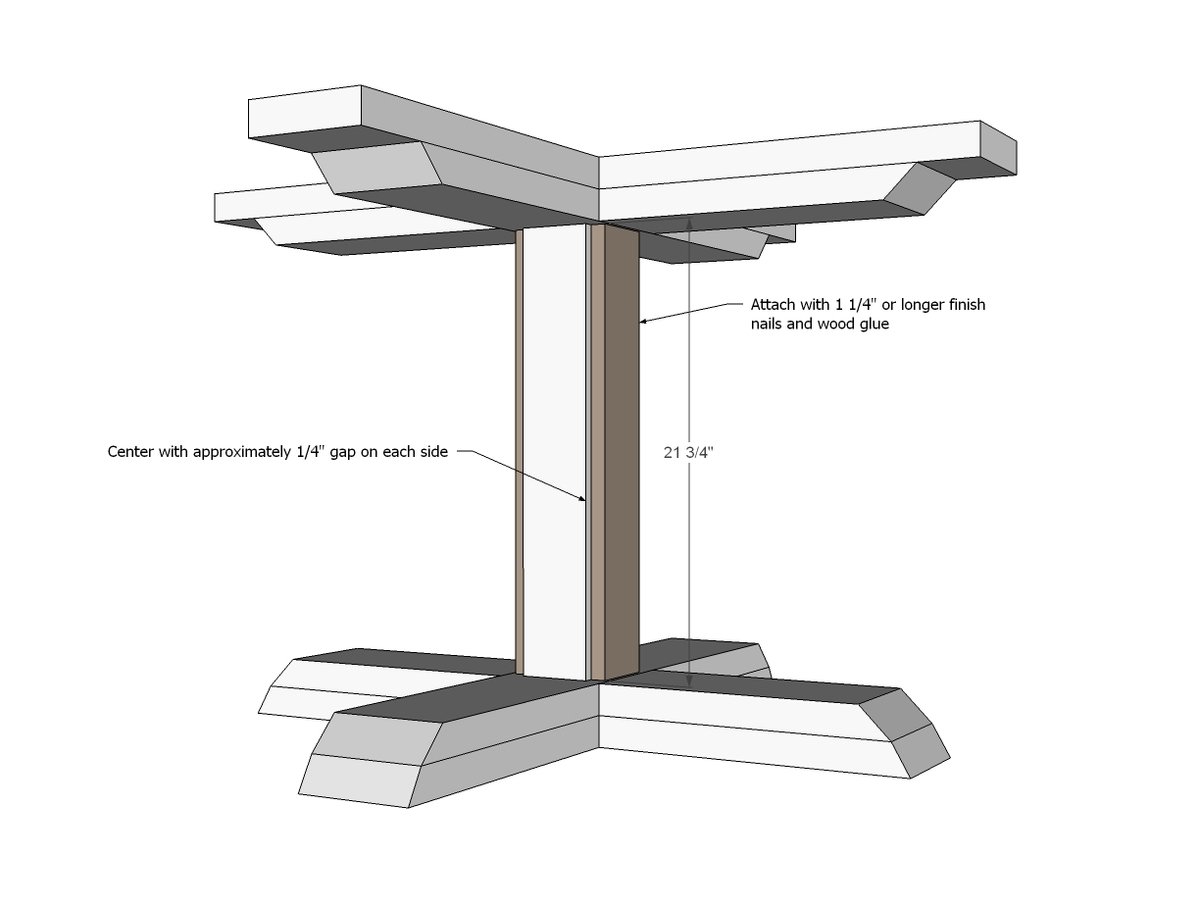
3 - 2x4 @ 21 3/4" (base center)
2 - 1x4 @ 21 3/4" (side trim)
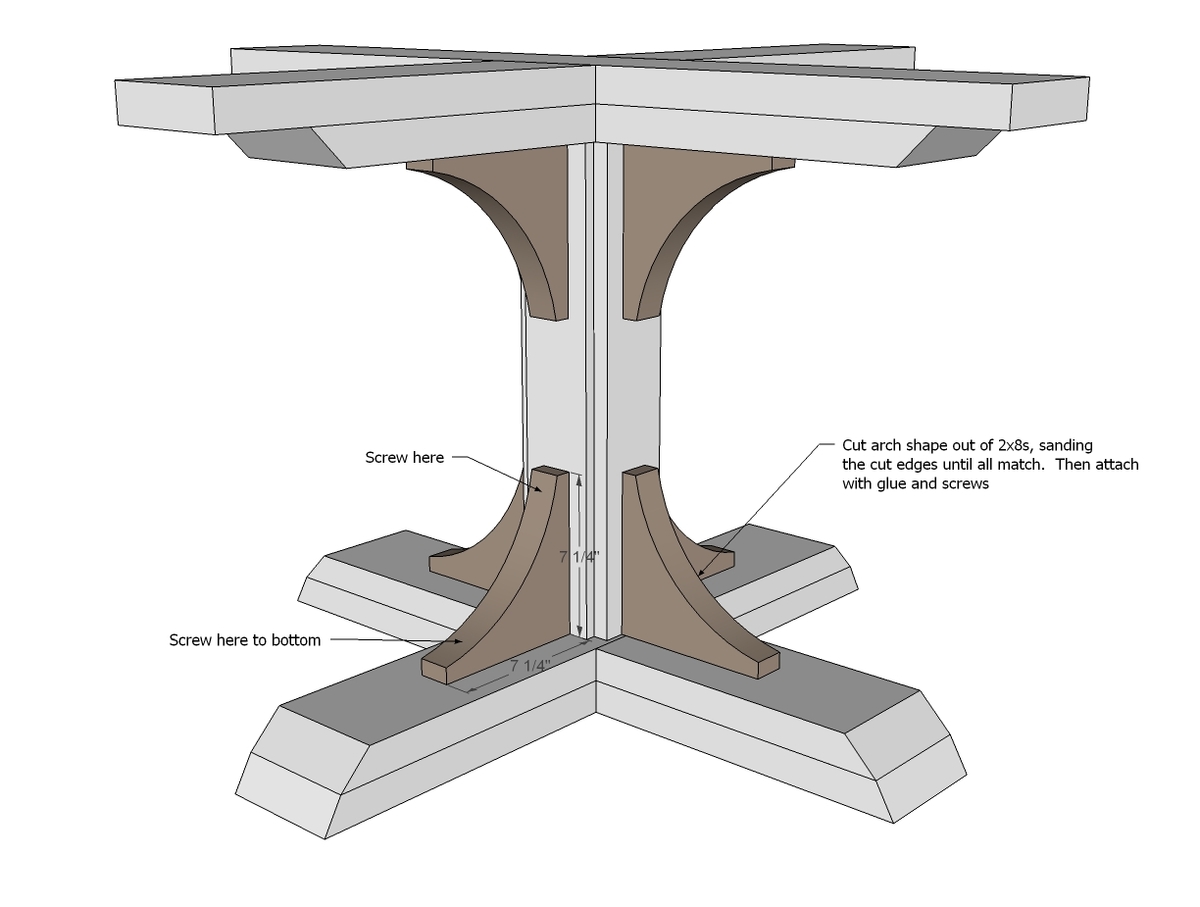
8 - 2x8 @ 7 1/4" (decorative supports, cut into arch shape)
BOTTOM BASE PIECES
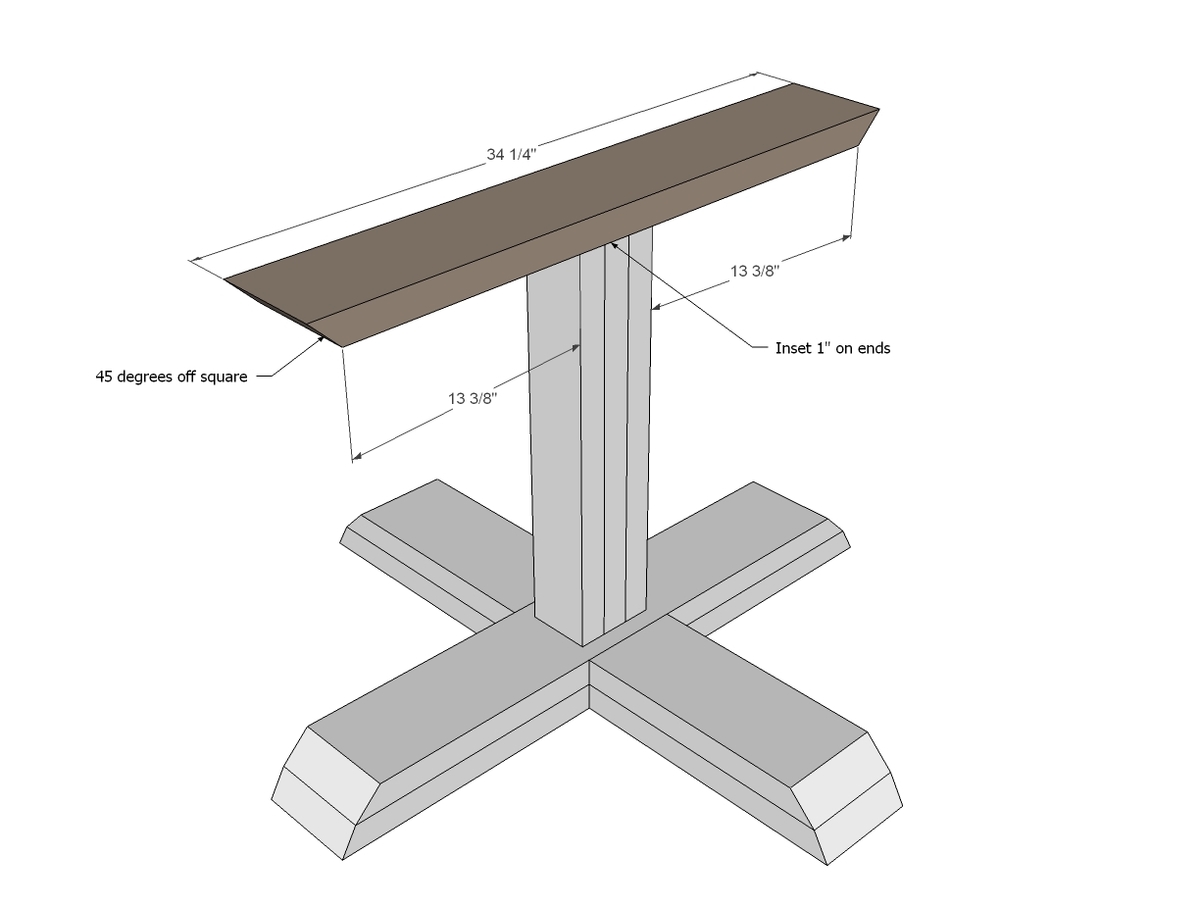
1 - 2x6 @ 34 1/4" (longest point measurement - both ends cut NOT parallel at 45 degrees BEVEL)
1 - 2x6 @ 36" (longest point measurement - both ends cut NOT parallel at 30 degrees off square BEVEL)
2 - 2x6 @ 14 3/8" (longest point measurement - ONE ends cut at 45 degrees off square BEVEL)
2 - 2x6 @ 15 1/4" (longest point measurement - ONE ends cut at 30 degrees off square BEVEL)
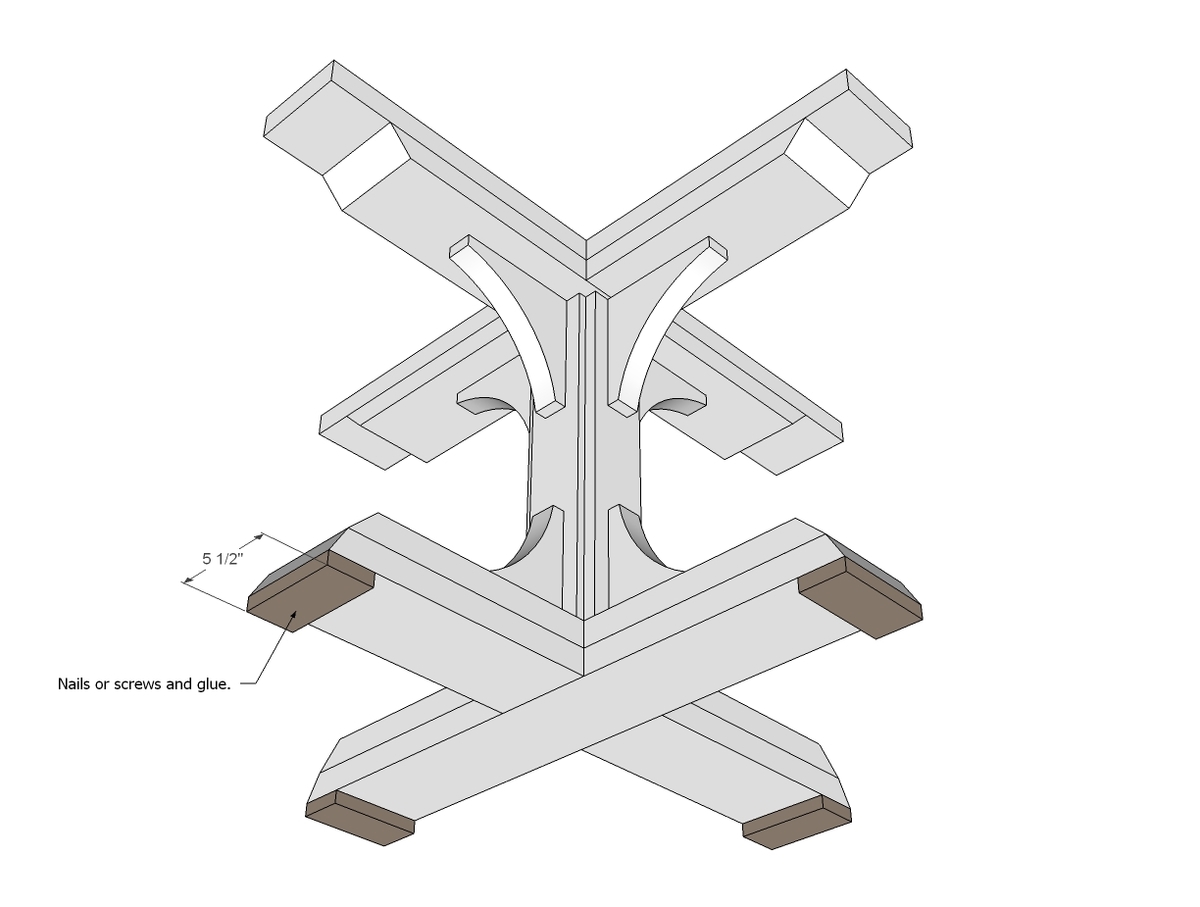
4 - 1x4 @ 5 1/2"
TOP BASE PIECES
1 - 2x6 @ 34 1/4" (longest point measurement - both ends cut NOT parallel at 45 degrees BEVEL)
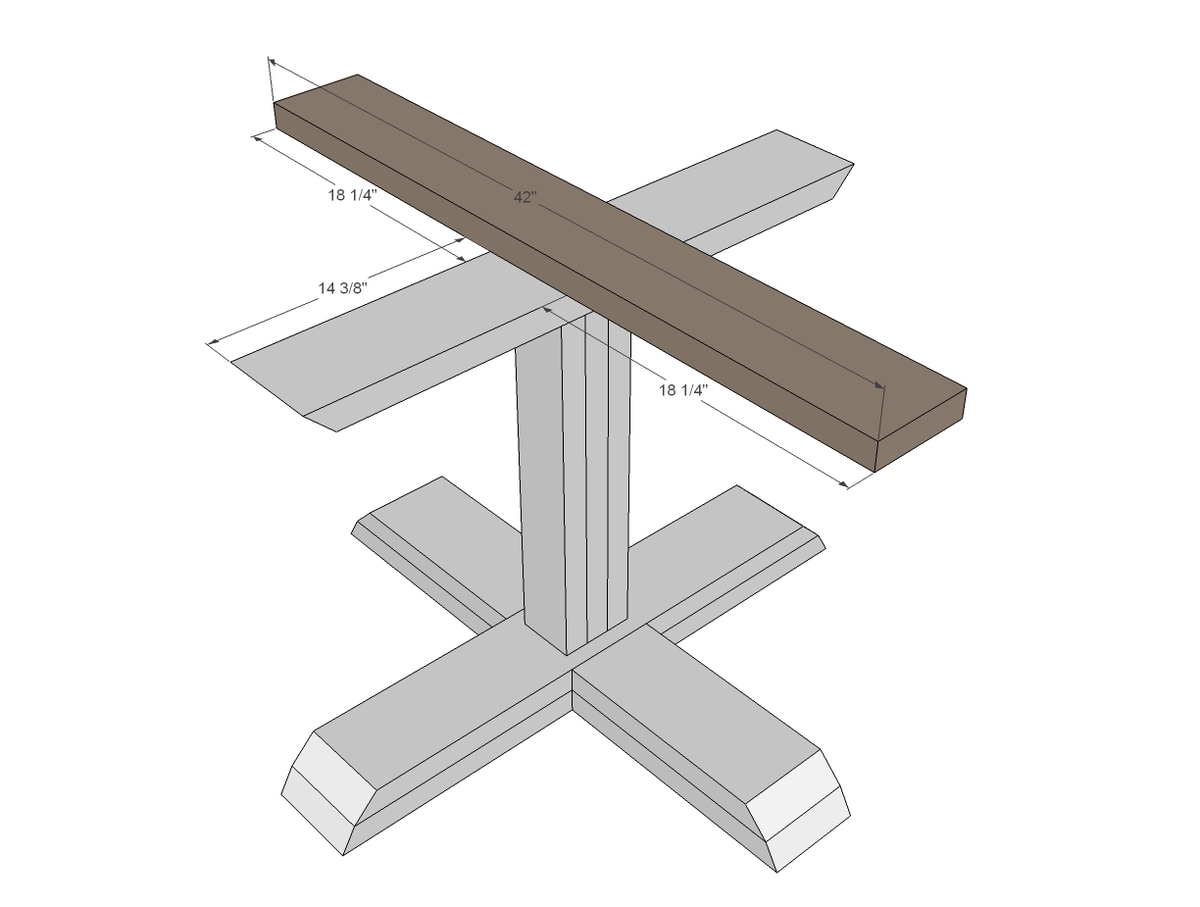
1 - 2x6 @ 42"
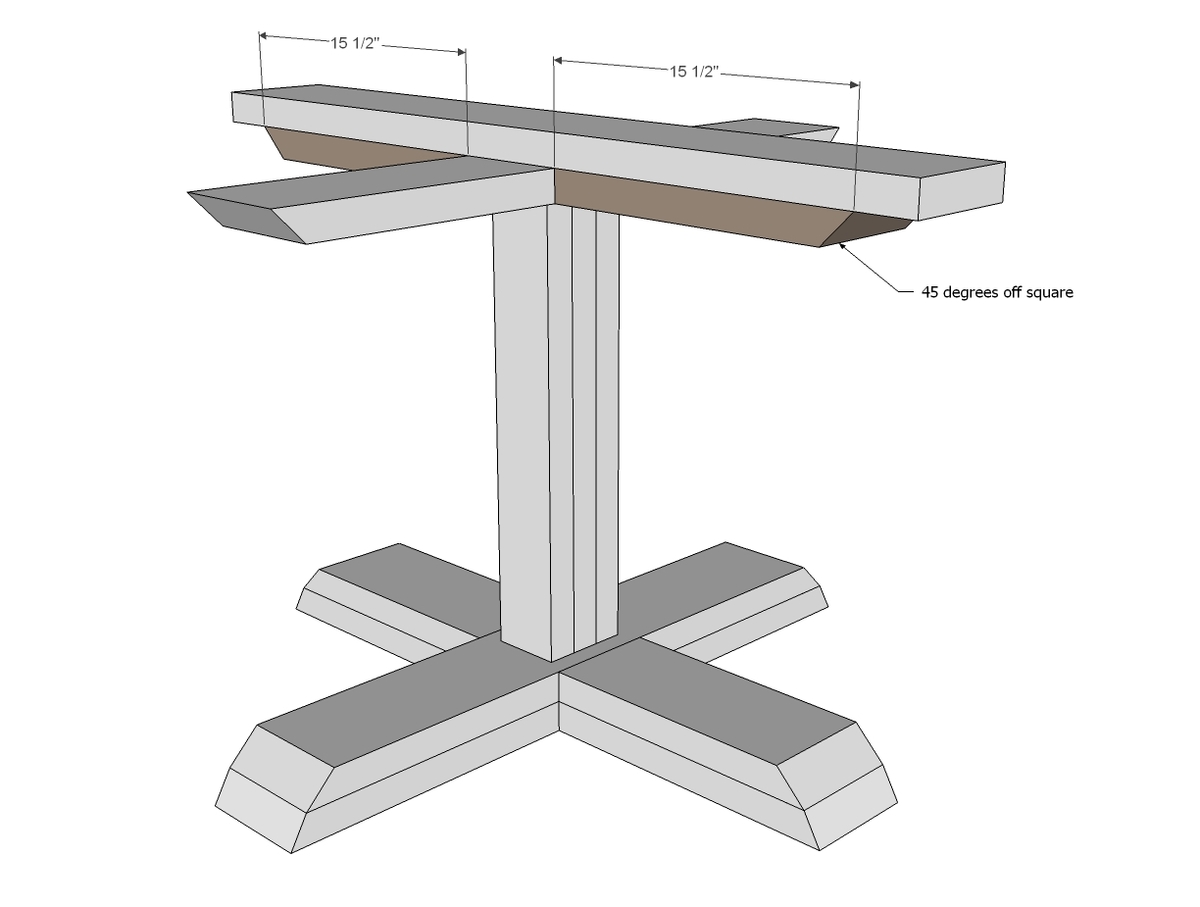
2 - 2x6 @ 15 1/2" (longest point measurement - ONE ends cut at 45 degrees off square BEVEL)
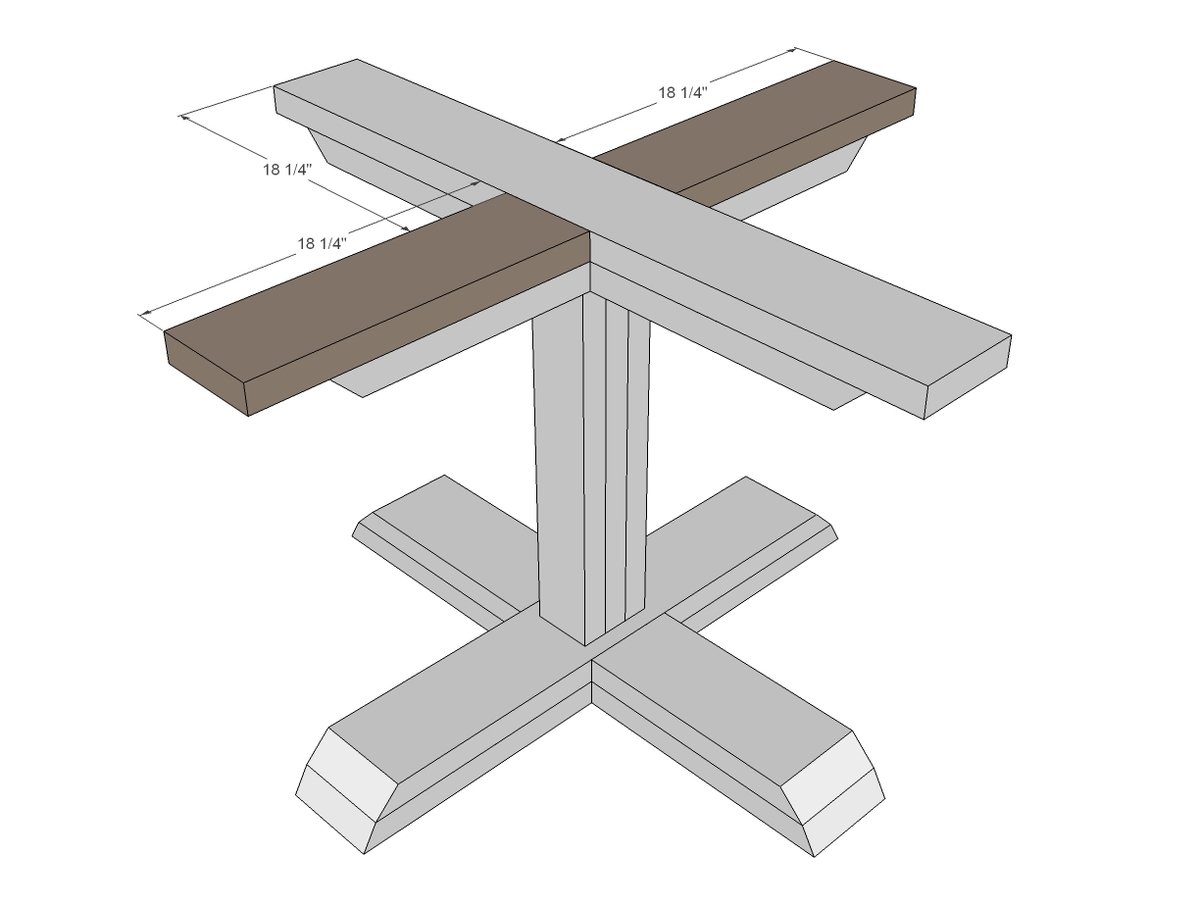
2 - 2x6 @ 18 1/4"
TABLETOP
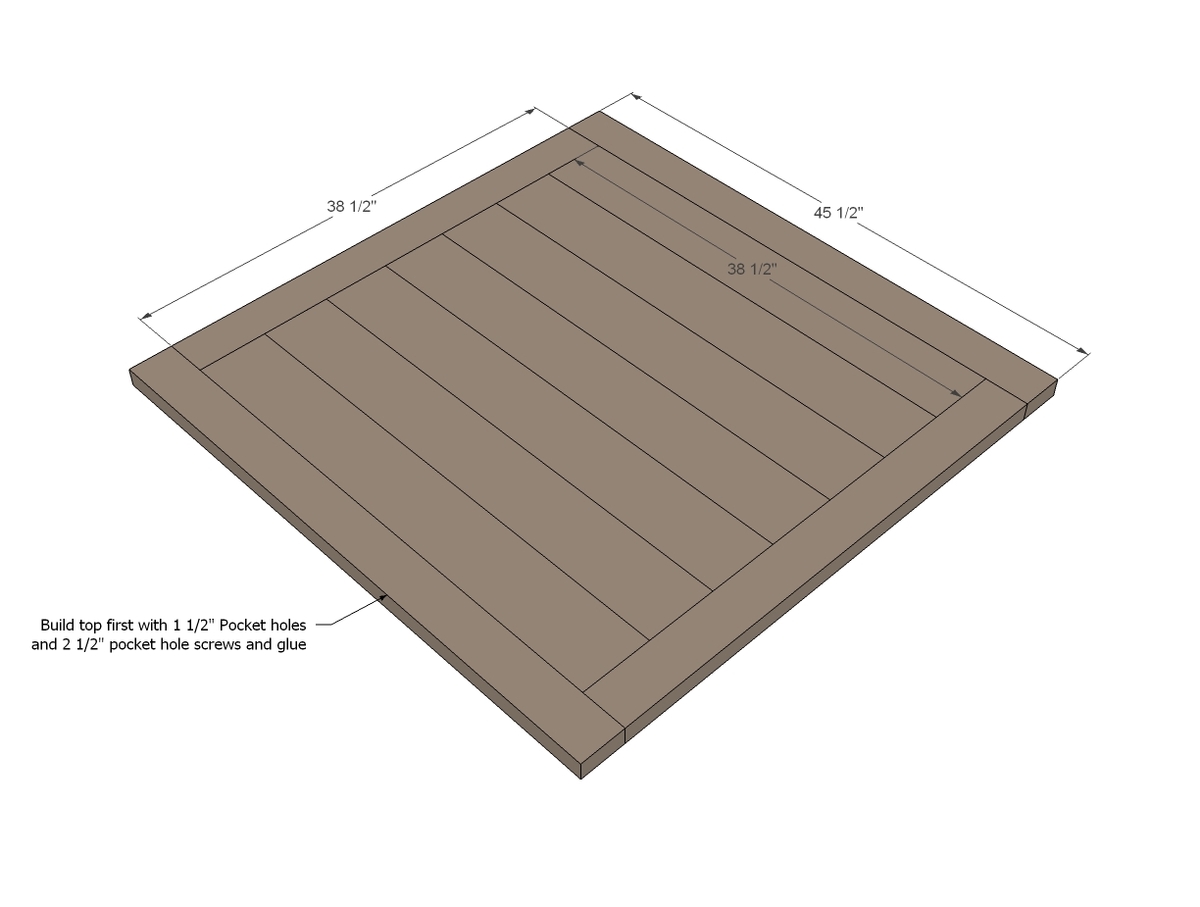
2 - 2x4 @ 38 1/2" (CUT TO FIT!!!)
2 - 2x4 @ 45 1/2"
7 - 2x6 @ 45 1/2"
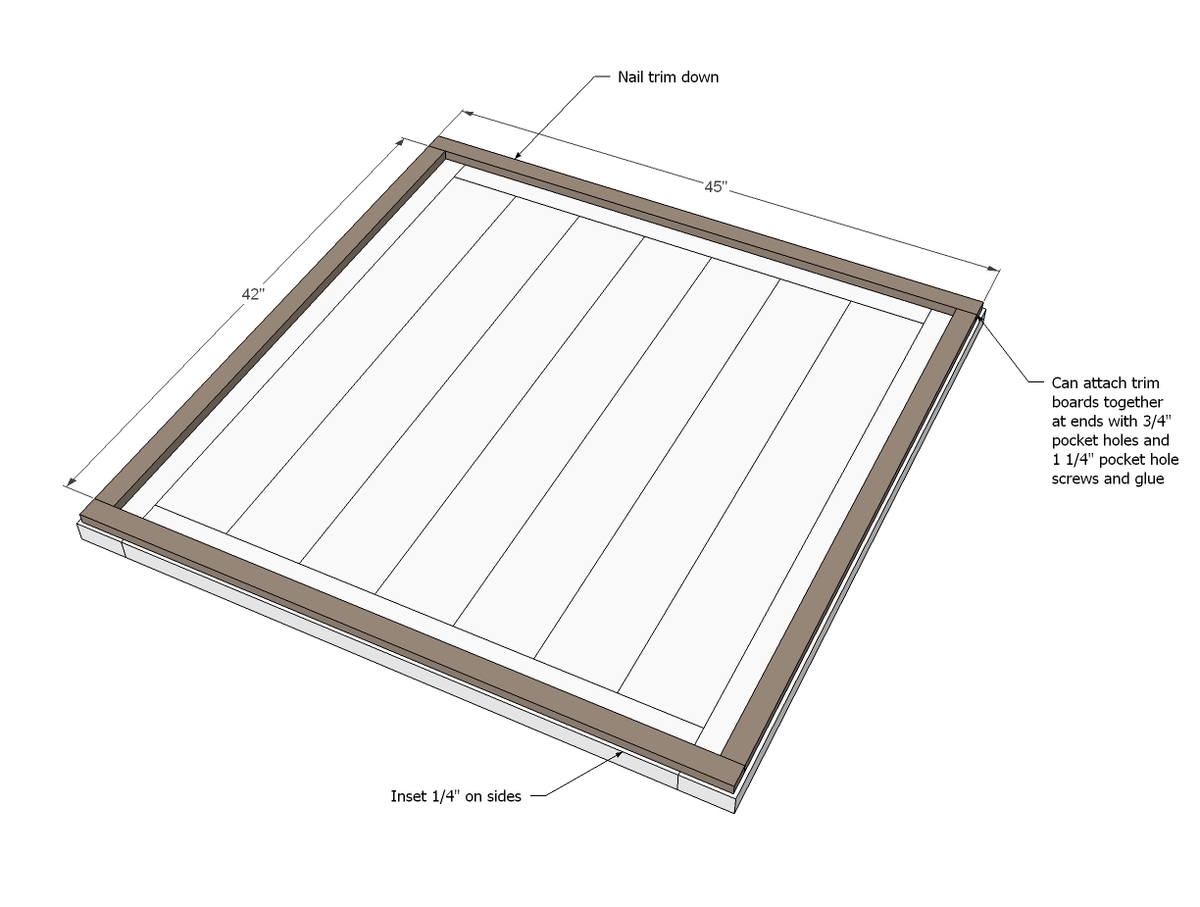
2 - 1x2 @ 42"
2 - 1x2 @ 45" (CUT TO FIT!!!!)
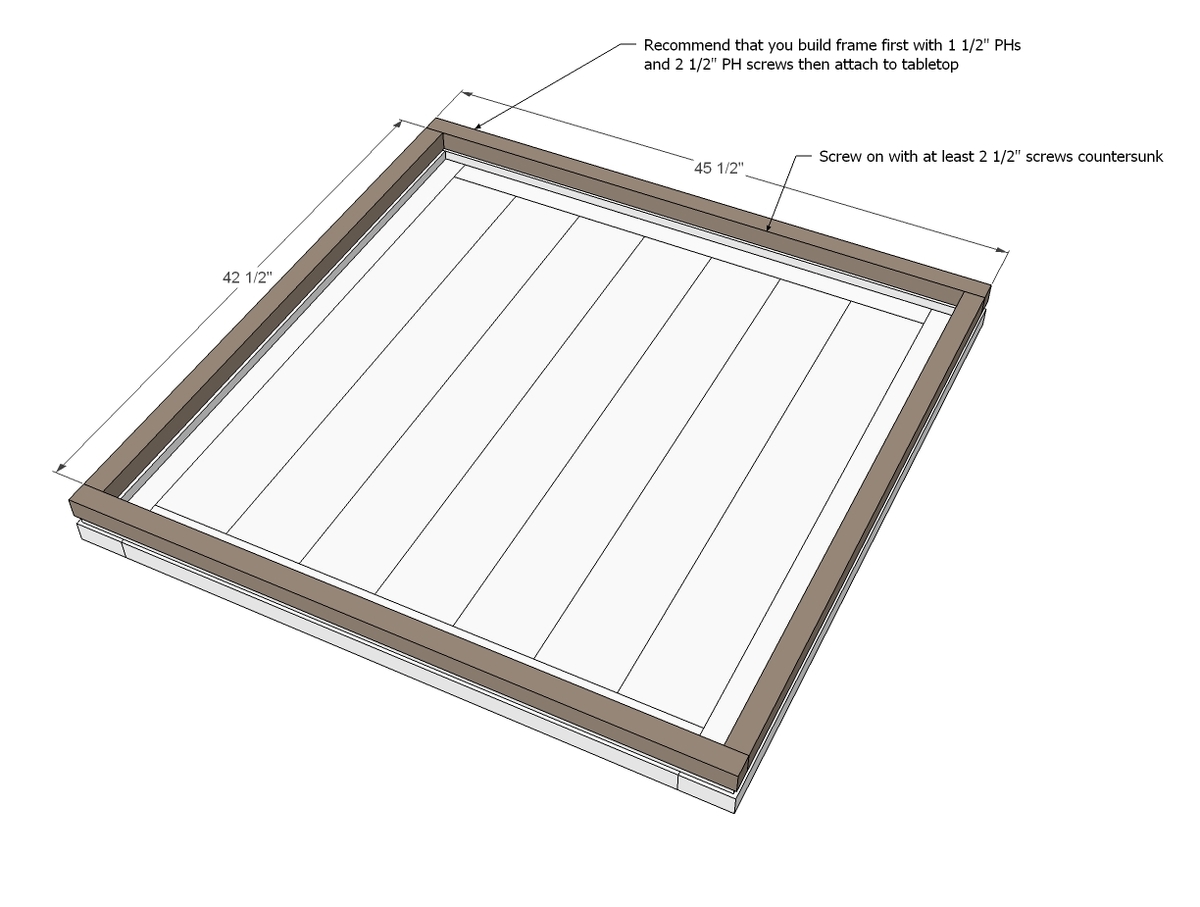
2 - 2x2 @ 42 1/2"
2 - 2x2 @ 45 1/2" (CUT TO FIT!!!!)
Step 1:
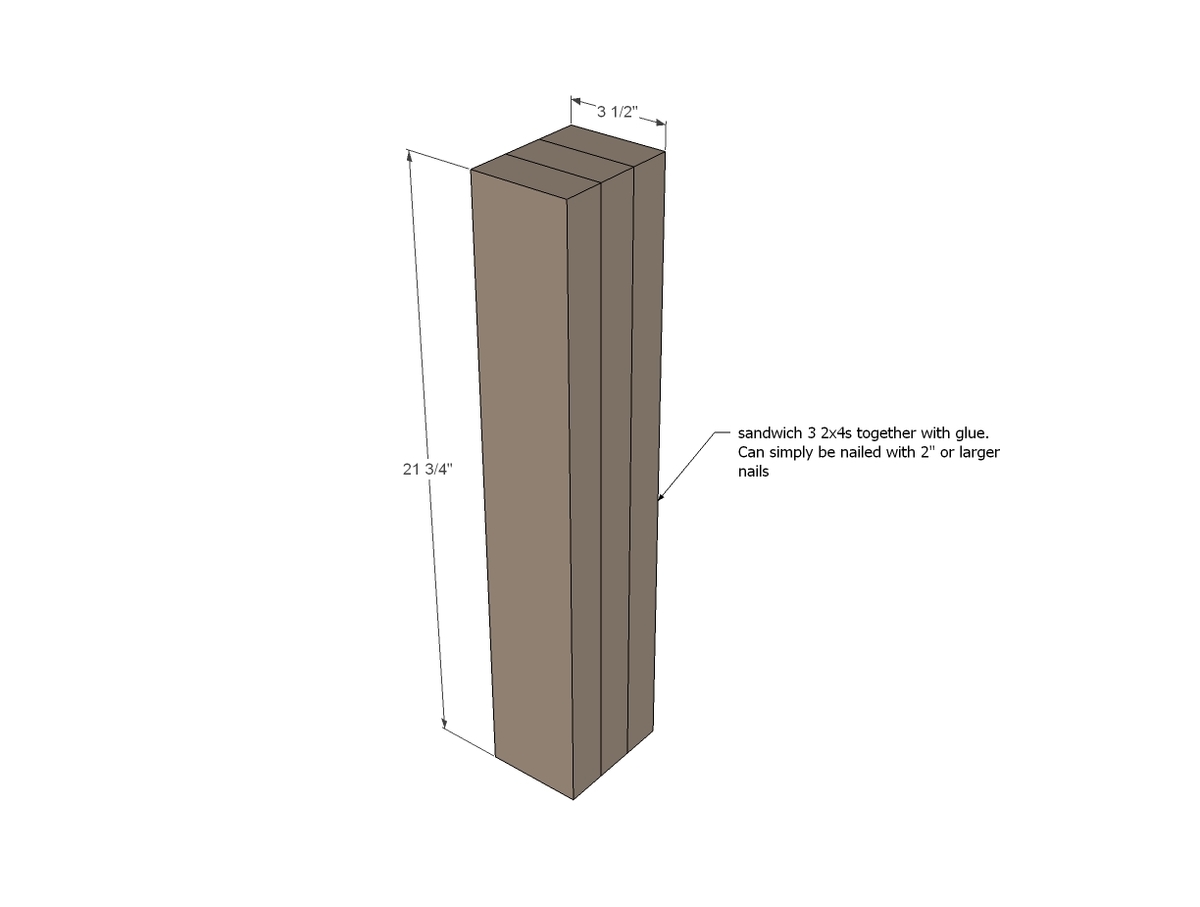
Start by sandwiching the center 2x4s together with glue and nails. You'll need at least 2" finish nails here, but 2 1/2" would be better depending on what your nailer shoots. Keep outside edges as flush as possible, but remember that we will cover the sides with 1x4s in later steps ... so don't stress it too much!
Step 2 Instructions:
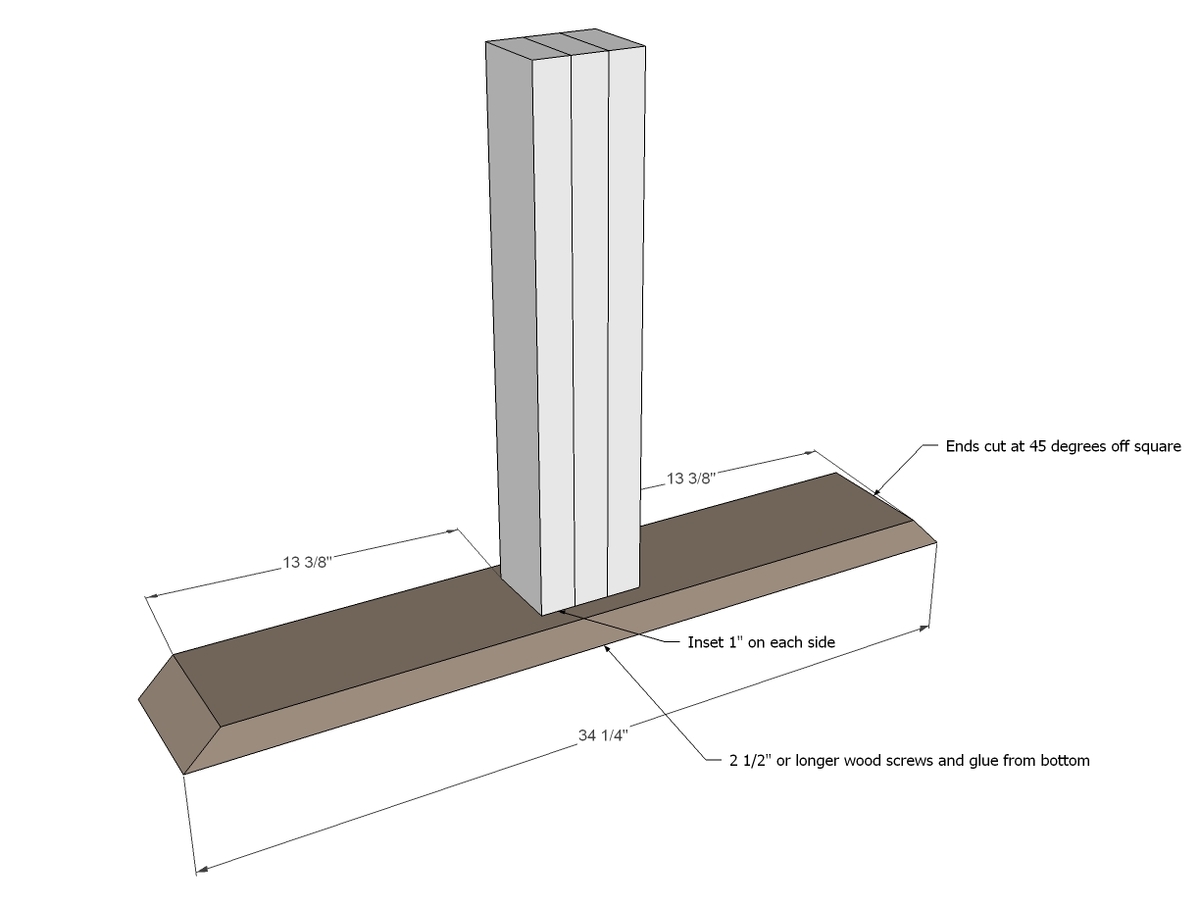
Now mark and measure the placement of the bottom board and attach from underside. Glue and screws and make sure you are square to the center pedestal.
Step 3 Instructions:
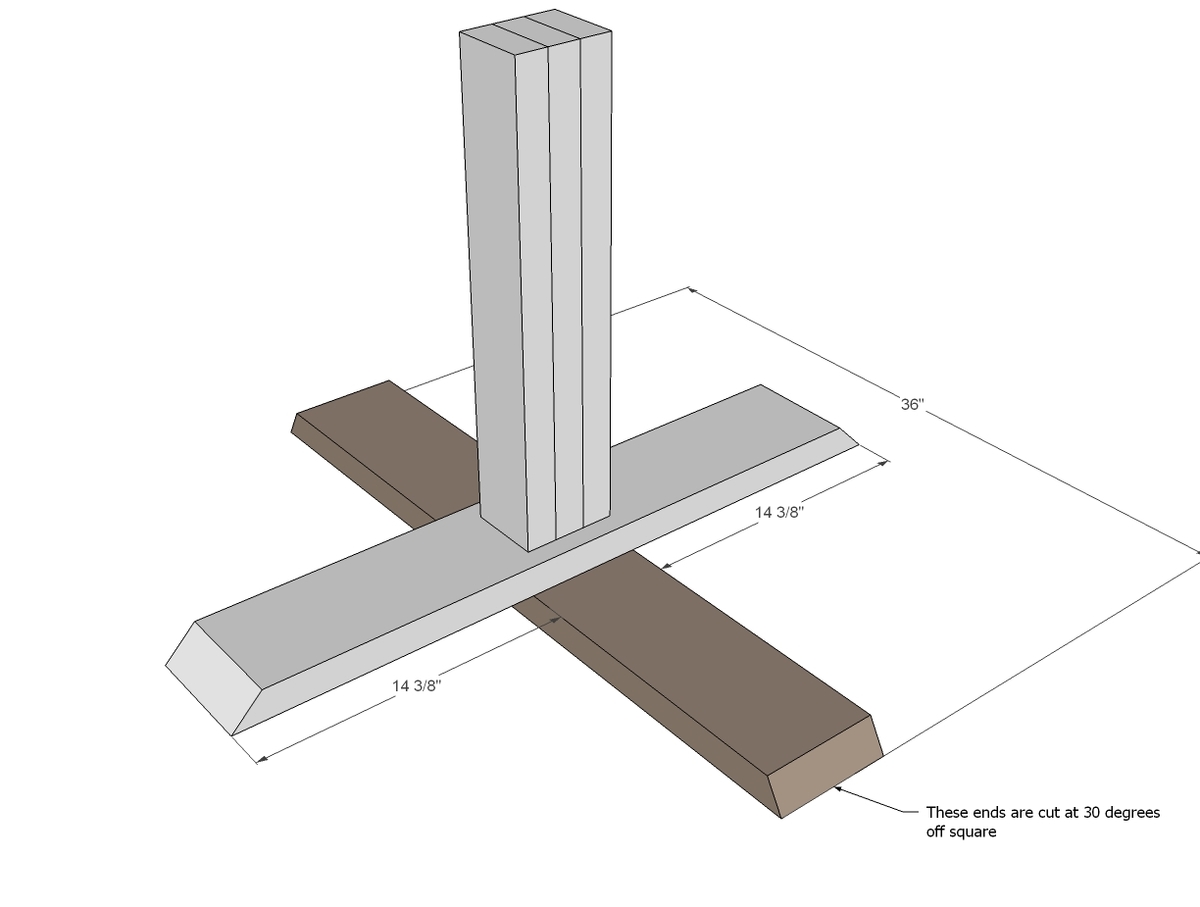
Then add the next board. Remember this one is the 30 degrees off square bevel. TIP: Use the boards from step 4 as a guide in placing.
Step 4 Instructions:
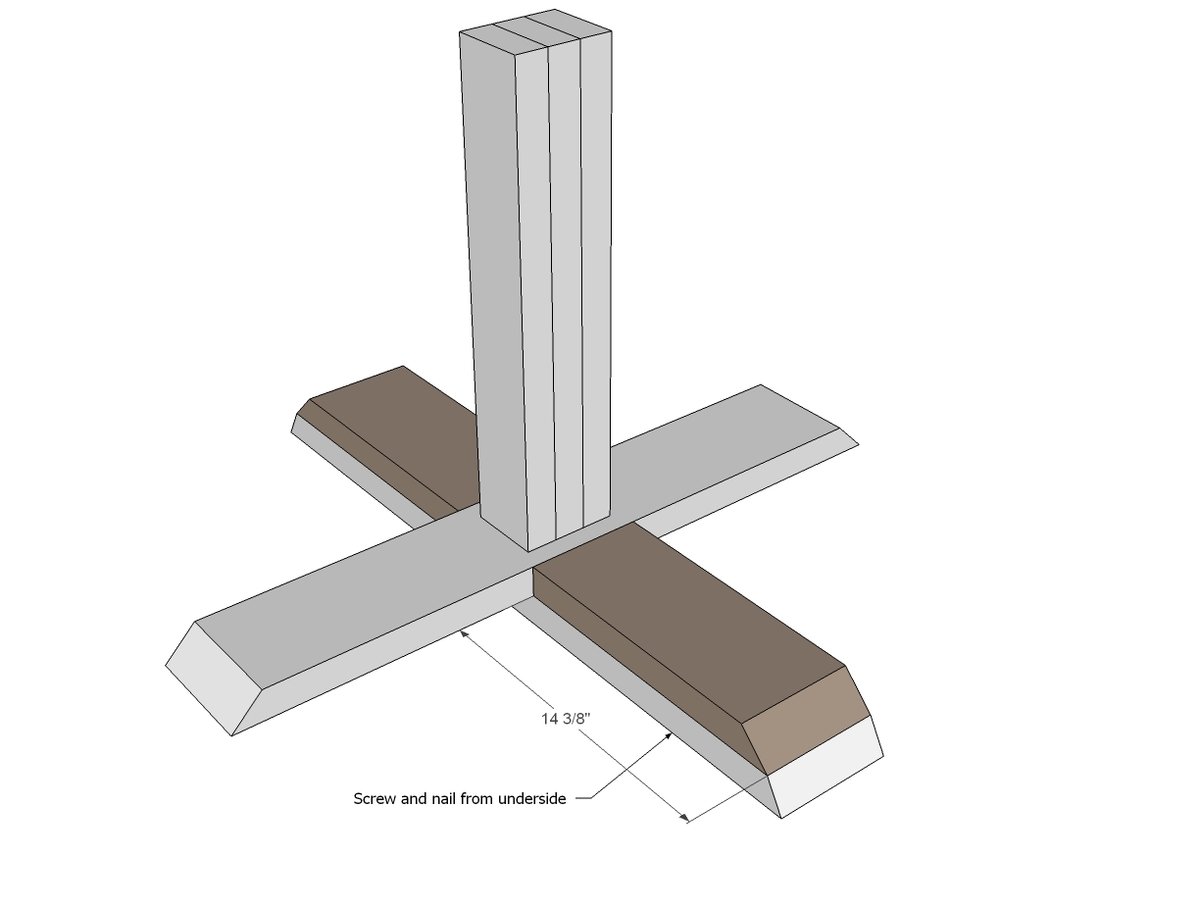
Now fill in with the spare boards. When you go to finish the base, sand joint to create a nice pretty curve on the ends.
Step 5 Instructions:
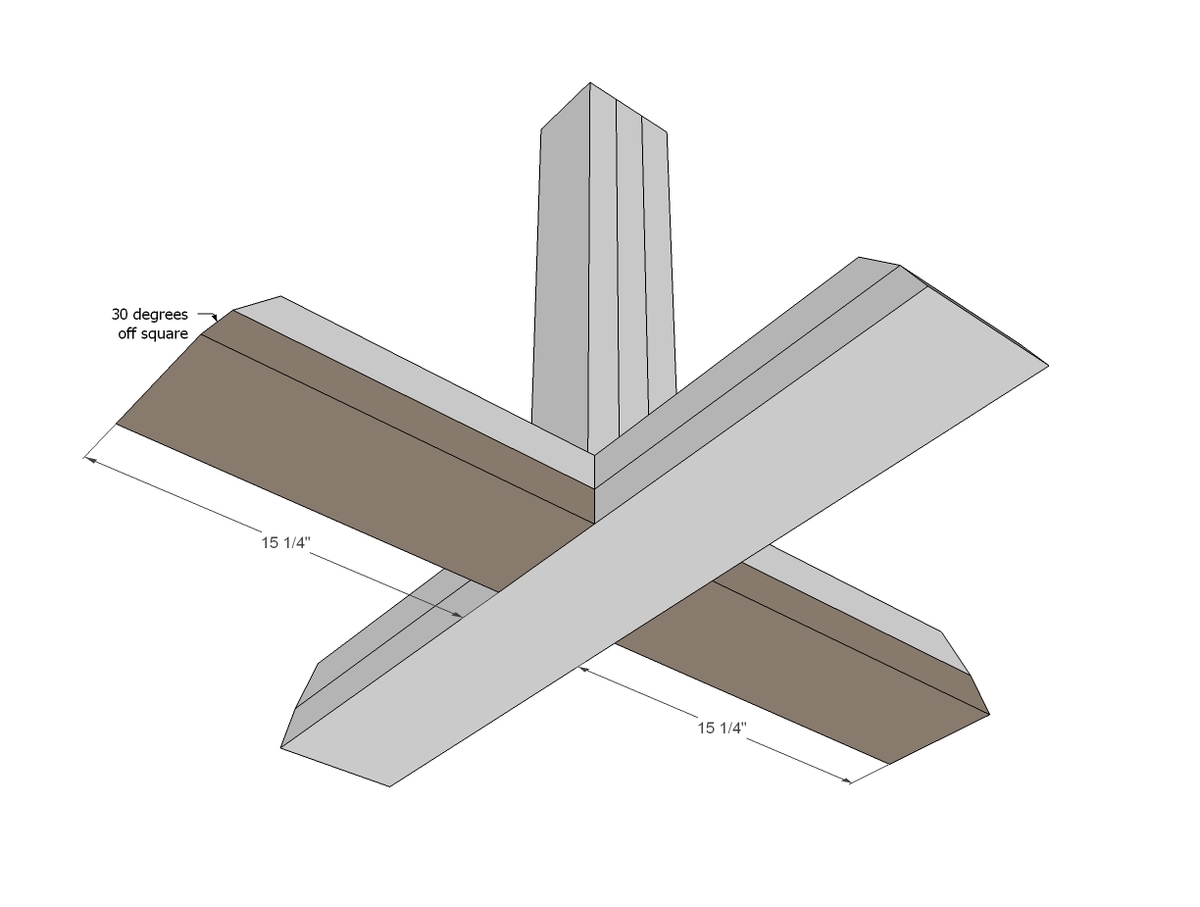
And then fill in the bottom part as well, this time with the 30 degree off square beveled boards. Glue and screw from underside to hide holes.
Step 6 Instructions:
Now we'll start working on the top. Mark placement of top board and attach to center pedestal.
Step 7 Instructions:
Mark placement of next board and attach with screws and glue.
Step 8 Instructions:
Fill in as shown here. Use 2 1/2" screws and wood glue, keeping outside edges flush.
Step 9 Instructions:
And then fill in your last boards, again 2 1/2" screws and glue.
Step 10 Instructions:
Now let's trim out that pedestal with 1x4s to make a little prettier.
Step 11:
Cut with a jigsaw the curved pieces if using, and attach with screws and glue.
Step 12:
You'll want to add these so your table doesn't rock on uneven floors. You can additionally add cork pads to protect your floors underneath.
Step 13:
Let's move on to the top. I highly recommend building to first with a pocket hole jig on the 1 1/2" setting, using 2 1/2" pocket hole screws.
Step 14:
These are really decorative - you don't have to put them on, but to keep the look, nail the 1x2s to the underside.
Step 15:
And then add the 2x2 frame.
Step 16:
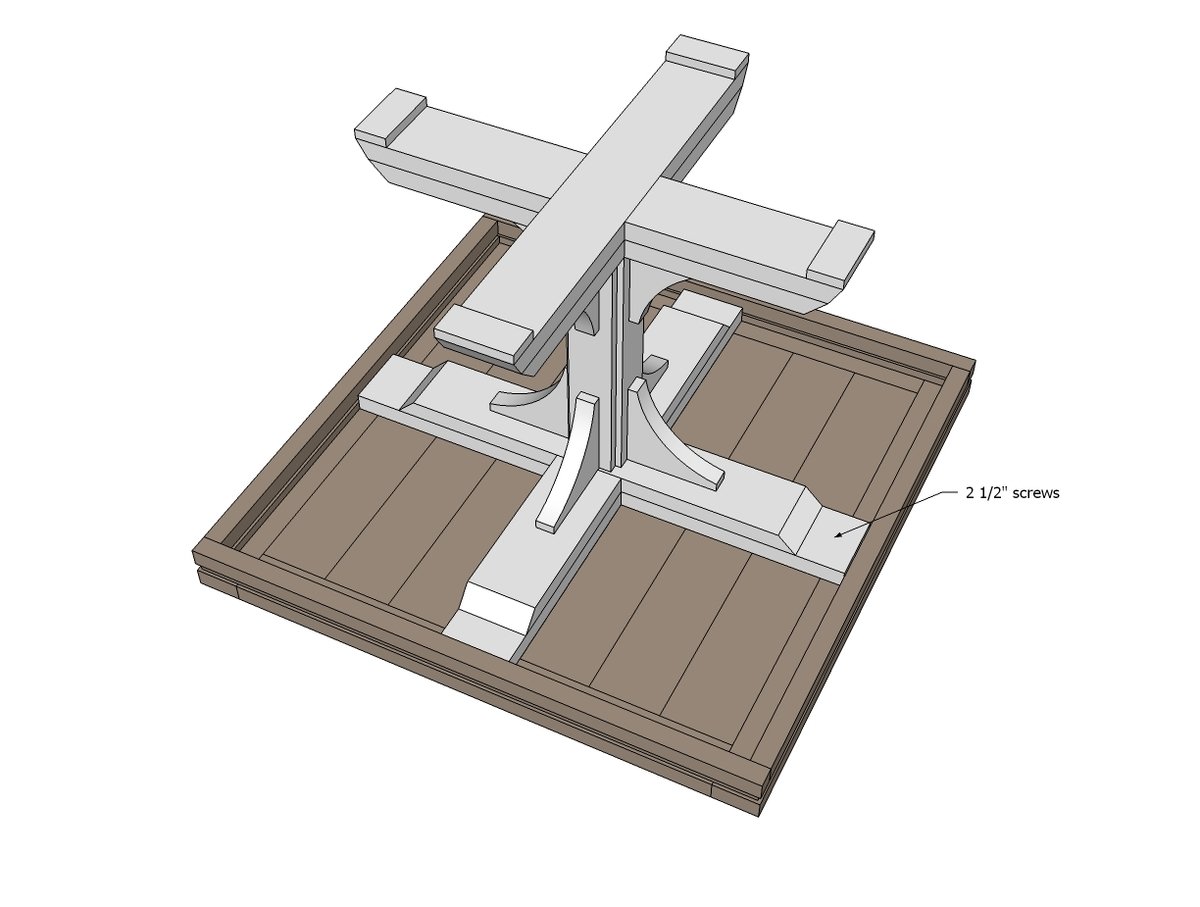
And finally, screw the top to the base! I'd leave the glue off here so you can dis-assemble/reassemble to move.
Preparation Instructions:
Fill all holes with wood filler and let dry. Apply additional coats of wood filler as needed. When wood filler is completely dry, sand the project in the direction of the wood grain with 120 grit sandpaper. Vacuum sanded project to remove sanding residue. Remove all sanding residue on work surfaces as well. Wipe project clean with damp cloth. It is always recommended to apply a test coat on a hidden area or scrap piece to ensure color evenness and adhesion. Use primer or wood conditioner as needed.Project Type:
Dining Tables
Room:
dining room
Skill Level:
Advanced
Style:
farmhouse
With the information we provide about How to build a pedestal table
, We hope you can be helped and hopefully set a precedent with you . Or also you can see our other references are also others which are not less good about How to Thread a Sewing Machine
, So and we thank you for visiting.
open tutorial sew : http://www.ana-white.com/2013/01/plans/square-pedestal-table


0 komentar:
Post a Comment